
How to set up a proctored exam: A simple guide for secure online assessments
Set up a proctored exam with Testlify using the right questions, proctoring controls, candidate rules, and review process.

A proctored exam is an online test monitored through identity checks, browser controls, screen activity tracking, webcam checks, and post-test review. The goal is to make sure the right person takes the test, follows the rules, and completes it in a controlled testing environment.
This matters more when assessments affect hiring, certification, compliance, or promotion decisions. In a 2024 Journal of Academic Ethics review, 44.7% of surveyed students self-reported cheating in online exams.
That does not mean every test needs the strictest setup. A short screening quiz and a final technical assessment should not be treated the same way. The right approach is to match the proctoring level to the risk of the exam.
In this guide, we will walk through how to set up a proctored exam using Testlify.
 ChatGPT
 Gemini
 Claude
 Grok
Grok Perplexity
TL;DR – Key takeaways
- A proctored exam helps verify identity, control the testing environment, and protect assessment integrity.
- Use online proctoring for high-stakes hiring, coding tests, certifications, compliance exams, and remote hiring.
- Prepare the purpose, format, rules, instructions, and device requirements before enabling proctoring.
- In Testlify, teams can create assessments, add role-relevant questions, and choose standard, strict, or custom proctoring.
- The best setup is not always the strictest one. Match proctoring controls to the risk level of the exam.

When should you use online proctoring?
Online proctoring is useful when the result needs to be trusted, reviewed, and defended. It is not only for academic exams. Recruiters and HR teams use it when assessments are remote and the score will influence a hiring decision.
For high-stakes hiring assessments
Use proctoring when the assessment decides who moves forward, gets shortlisted, or receives an offer. This is especially important for senior roles, technical roles, finance roles, healthcare roles, security-sensitive roles, and roles where a bad hire can be costly.
For technical and coding tests
Coding tests are more vulnerable to outside help because candidates can use search engines, AI tools, code snippets, messaging apps, or another person’s support. Proctoring adds controls like full-screen mode, tab tracking, session recording, copy-paste tracking, and AI assistance detection.
For certification or compliance-heavy tests
If the exam supports a license, compliance requirement, internal qualification, or skill certification, proctoring helps create an audit trail. Identity checks, timestamps, recordings, and violation logs give reviewers more context if a result is questioned later.
For remote and high-volume hiring
Remote hiring often means candidates take tests from different locations, devices, and networks. In volume hiring, manual review becomes difficult. Online proctoring helps standardize the process while keeping evidence available for flagged sessions.
What should you prepare before setting up a proctored exam?
A secure exam starts before you enable proctoring. If the test purpose, rules, and instructions are unclear, candidates may get confused and reviewers may struggle to judge violations fairly.
Define the exam purpose
Start with one question: what decision will this exam support? A screening test may only need light controls, while a final-stage assessment may need stricter monitoring and review evidence.
Choose the right test format
Pick the format that matches the role. For example, a developer role may need coding tasks, a customer support role may need written and voice responses, and a sales role may need video or scenario-based questions.
Decide what counts as unauthorized materials
List what candidates cannot use during the exam. This may include phones, notes, AI tools, browser tabs, messaging apps, calculators, second monitors, headphones, or another person in the room.
Write clear candidate instructions
Good instructions reduce false flags. Tell candidates what permissions are required, whether the camera and microphone must stay on, whether breaks are allowed, what happens if they leave the screen, and who to contact if they face a technical issue.
Check device, browser, and internet requirements
Before launch, confirm whether candidates need a laptop or desktop, webcam, microphone, stable internet connection, and a supported browser. This avoids last-minute drop-offs and incomplete submissions.
Setup item | What to decide before enabling proctoring |
|---|---|
Exam purpose | Screening, final hiring round, certification, or compliance check |
Test format | Skill test, coding test, video response, file upload, simulation, or custom questions |
Candidate rules | Allowed and restricted materials |
Device requirements | Laptop or desktop, camera, microphone, browser, and internet |
Review process | Who reviews flags, recordings, and violations after submission |
Candidate message | Short instructions, privacy note, and troubleshooting details |
How do you set up a proctored exam in Testlify?
Testlify lets teams create role-based assessments, add relevant tests and questions, and then apply proctoring controls based on the risk level of the exam. Here is the workflow.
Step 1. Create the assessment
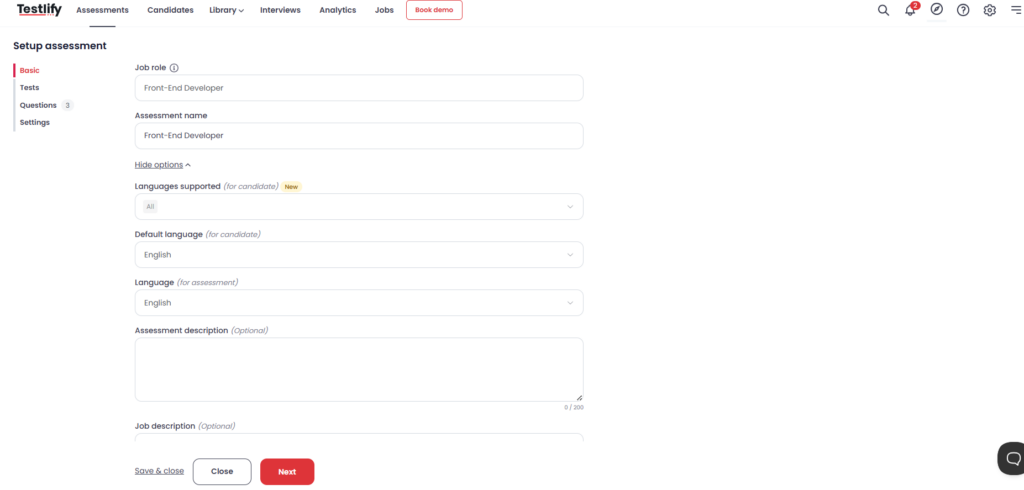
Start by creating a new assessment in Testlify. Add the job role, assessment name, candidate language, description, and job description.
Keep this part clean and specific. The assessment name should be easy for your team to identify later. The description should tell candidates what the test is about without overloading them with policy text.
Step 2. Add tests and job-relevant questions
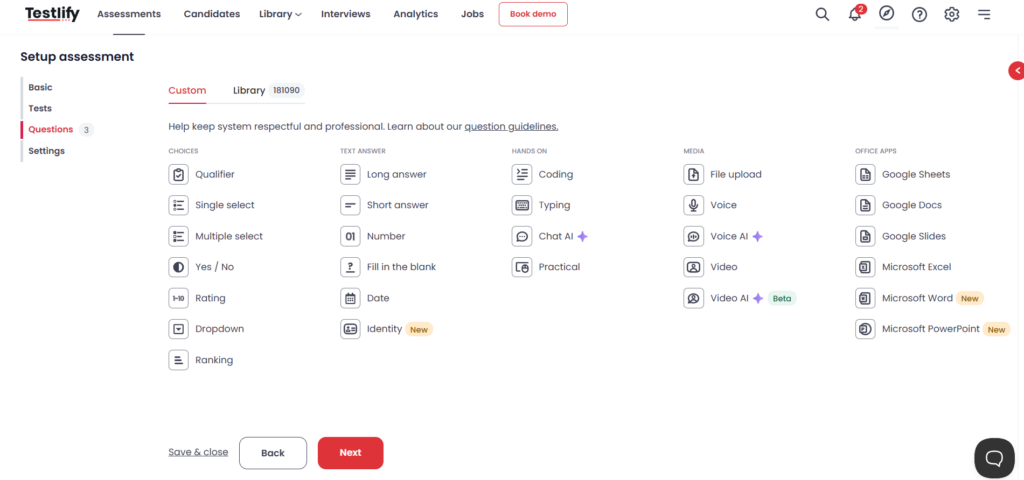
Next, add the tests and questions that match the role. You can use ready-to-use tests, add custom questions, or combine multiple formats in one assessment.
Watch: How to add custom questions?
For example, a technical hiring assessment may include a coding test, multiple-choice questions, and a file upload task. A customer-facing role may include video, voice, written, or chat-based questions. Where relevant, you can also use identity questions, Google and Microsoft simulations, or role-specific custom questions.
The important point is this: proctoring should protect a well-designed test, not compensate for a weak one. If the questions do not reflect the role, stricter monitoring will not make the assessment more useful.
Step 3. Choose the proctoring setup
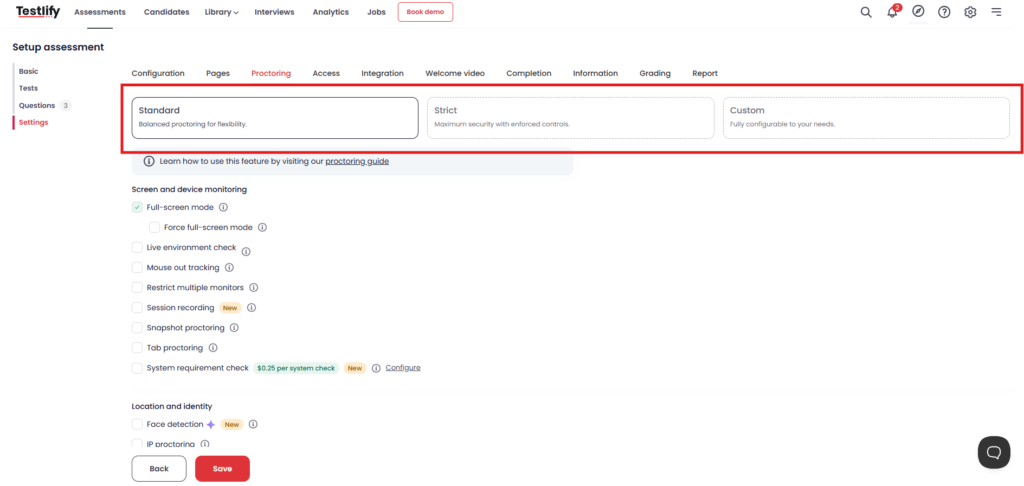
Once the assessment is ready, choose the proctoring level. In Testlify, you can use a standard, strict, or custom setup depending on the risk of the exam.
Proctoring setup | Best for | How to use it |
|---|---|---|
Standard | Early-stage screening and lower-risk assessments | Use balanced controls without making the test feel too restrictive |
Strict | Final rounds, high-stakes roles, coding tests, and compliance-heavy exams | Use stronger monitoring, tighter violation settings, and clearer review rules |
Custom | Mixed assessment types or teams with specific policies | Turn controls on or off based on role, risk, candidate experience, and review needs |
For most hiring teams, custom proctoring works best. It gives you control without forcing every candidate into the same rigid experience.
Step 4. Configure screen and device monitoring
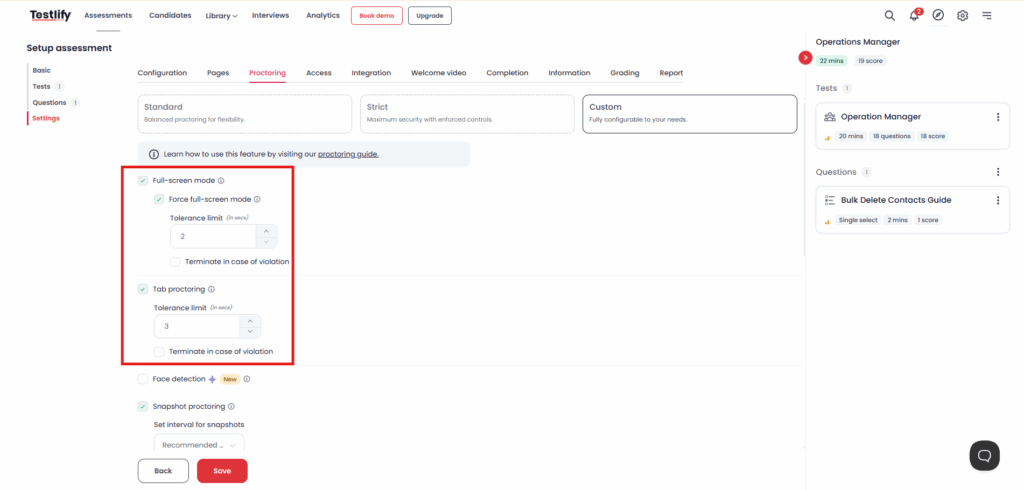
Screen and device monitoring helps reduce common online test risks such as tab switching, screen sharing, off-screen activity, and second-monitor use.
In Testlify, you can configure controls such as full-screen mode, force full-screen mode, live environment check, mouse-out tracking, multiple monitor restriction, session recording, snapshot proctoring, tab proctoring, and system requirement checks.
Use these controls carefully. For a short screening test, basic full-screen and tab tracking may be enough. For a final coding test, you may want stronger controls, session recording, and stricter violation limits.
Step 5. Configure identity and location checks
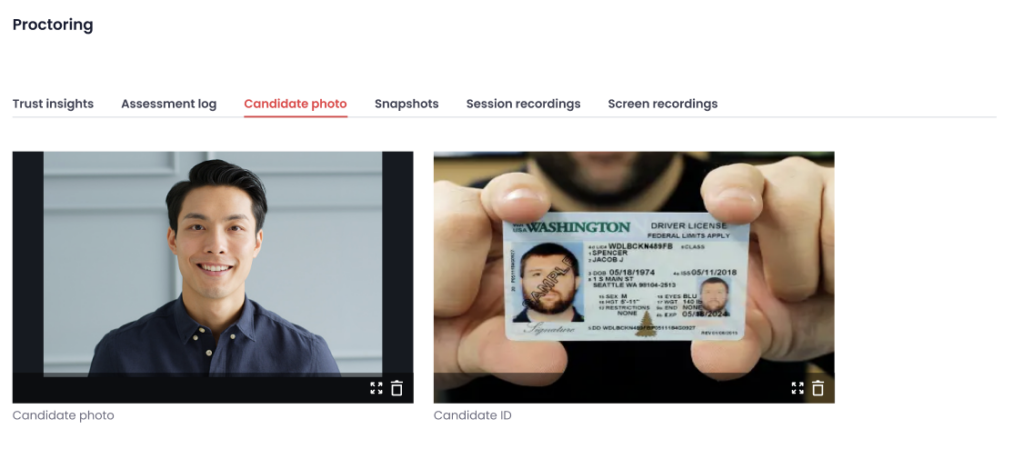
Identity checks help confirm that the invited candidate is the one taking the exam. This is important for remote hiring, certification tests, and any assessment where impersonation is a real concern.
In Testlify, you can use face detection, photo ID verification, IP-based proctoring, and geolocation where applicable. These checks can help flag cases where the candidate’s face disappears, another person appears, the session location looks unusual, or the test is accessed from an unexpected network.
Be clear about privacy here. Candidates should know what is being checked, why it is being checked, and how the information supports fair assessment review.
Step 6. Add integrity controls
Integrity controls focus on behavior during the test. These settings help reduce outside help, content misuse, and suspicious answer patterns.
In Testlify, this can include AI assistance detection, copy-paste tracking, talking prohibition, question randomization, time limits, violation tolerance settings, and auto-termination rules when the test risk justifies it.
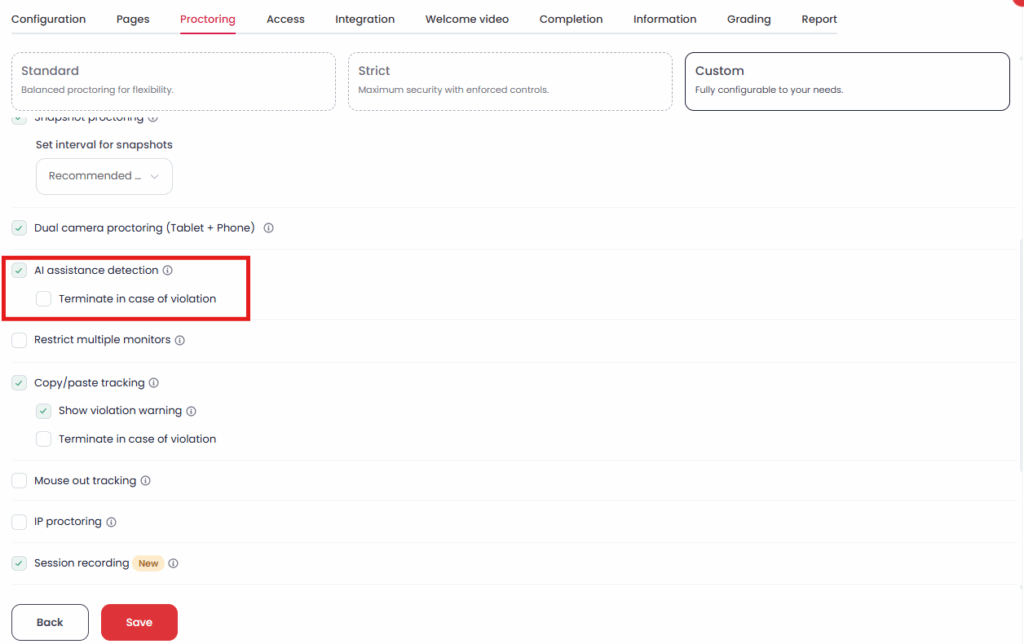
Use auto-termination carefully. It can protect high-stakes exams, but it can also create a poor candidate experience if the rules are too strict for the situation. A better approach is to define violation tolerance by exam type and review flagged sessions with context.
Integrity control | What it helps prevent |
|---|---|
AI assistance detection | Use of AI tools during the assessment |
Copy-paste tracking | Copying questions, pasting outside answers, or moving content between tools |
Talking prohibition | Outside verbal help or another person coaching the candidate |
Question randomization | Sharing fixed question sequences between candidates |
Time limits | Overuse of outside help or long delays between answers |
Violation tolerance | Over-penalizing minor behavior while still flagging repeated issues |
Auto-termination | Continued serious violations in high-risk exams |
Step 7. Review access, instructions, and candidate experience
Before publishing, review the experience from the candidate’s side. Make sure the invite, instructions, privacy note, allowed materials, restricted materials, and technical requirements are easy to understand.
This step matters because proctoring can feel stressful if candidates do not know what to expect. A 2023 study on online proctoring concerns found that many test takers worry about being wrongly flagged. Clear instructions help reduce that anxiety and lower avoidable violations.
Keep the wording simple. Tell candidates what they need, what they should avoid, and what will happen if the system detects suspicious activity. Do not bury key rules in long policy text.
Step 8. Publish and invite candidates
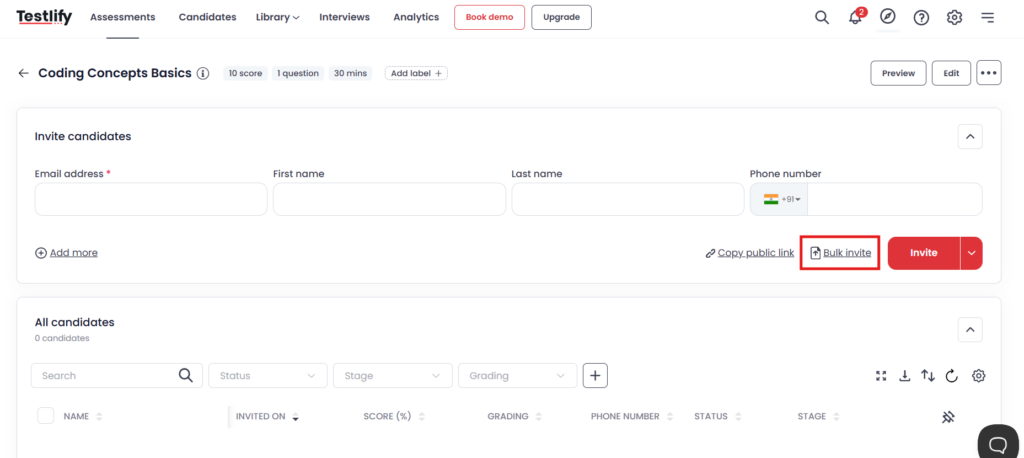
Once the assessment, questions, proctoring controls, and instructions are ready, publish the assessment and invite candidates.
Before sending it widely, test the flow with one internal user. Check whether the invite is clear, the assessment opens properly, permissions are requested at the right time, and proctoring settings work as intended.
After that, send the invite. Keep the candidate message short. Include the assessment purpose, estimated time, device requirements, deadline, and support contact.
Discover More: Proctoring features offered by Testlify
Which proctoring settings should you choose for different exam types?
There is no single best setup for every proctored exam. The right setup depends on the stakes, role type, candidate volume, and review requirements.
Exam type | Recommended proctoring setup | Suggested controls |
|---|---|---|
Early-stage screening | Standard | Basic full-screen mode, tab tracking, time limits, and clear candidate instructions |
Final hiring assessment | Strict or custom | Identity checks, session recording, snapshot proctoring, tab tracking, copy-paste tracking, and violation review |
Coding test | Strict | Force full-screen mode, AI assistance detection, copy-paste tracking, tab proctoring, time limits, and session recording |
Certification or compliance test | Strict | Photo ID verification, face detection, session recording, environment check, strict violation limits, and audit logs |
High-volume remote hiring | Custom | Scalable controls, system requirement checks, identity verification, automated flags, and post-test review evidence |
Low-risk skills quiz | Standard | Light monitoring, time limits, and clear instructions without excessive restrictions |
The safest approach is to start with the minimum control needed for trust, then add stricter settings only when the exam risk justifies it.
H2: Final takeaway
A proctored exam works best when the setup is clear, fair, and matched to the stakes of the assessment. Start with the test purpose, choose the right question format, define the rules, enable the right proctoring controls, and review flagged sessions with context.
With Testlify, hiring teams can create role-based assessments, apply flexible proctoring settings, and review evidence without making the process harder than it needs to be.
Want to run secure online assessments without adding friction for every candidate? Book a demo with Testlify and see how proctoring can fit into your hiring workflow.
Frequently asked questions (FAQs)

B2B SaaS Content Writer
Rishav Kumar is a B2B SaaS content writer with 4 years of experience. He loves crafting engaging content. Always exploring fresh ideas, he's passionate about helping businesses grow through impactful writing.
LinkedInRelated resources
View all
Proctoring
Online proctoring services compared: top 5 tools vs Testlify

Proctoring
Lockdown browser: Features, benefits & limitations

Proctoring
AI proctoring compliance: GDPR & FERPA explained

Proctoring
How to build a proctored exam for high-stakes assessment

Proctoring
AI vs human proctoring: What works best?

Proctoring
AI Proctoring Solution: A 2026 Buyer Guide for Hiring Teams
Get started.
Hire on proof, not resumes.
Run your first skills-based assessment free — no credit card required.